
Photography brings any website to life.
Whether it is a background image that is revealed as you scroll down the page, or a banner image that introduces the brand to the visitor, choose your images carefully. The origin of the phrase “Use a picture. It’s worth a thousand words.” is disputed (maybe Tess Flanders in the Syracuse Post Standard in 1911 or Frederick Barnard in Printer’s Ink in 1921). But its relevance is still true a hundred years later, and as true for websites as it was (or is) for newspapers and books.
Best option: take your own.
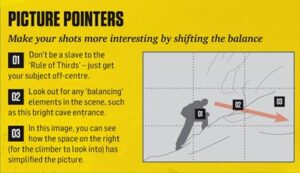
Original content is valued by search engines, so original photographs will help your website climb higher up search results. This article on 10 Rules of Photo Composition has useful diagrams explaining why a rule matters for less experienced photographers:
and this article on website photography gives useful tips specifically for small business websites.
Here’s a photo of my cup of coffee this morning:

Easy, right?
Best paid option: commission a photographer.
This way you still get your original content, but with the help of a trained eye. Katie Vandyck from Excellent Headshots has expert knowledge of website photography, from mood shots to products for ecommerce sites.
Best free option: royalty-free photos.
I have already written about the amazing generosity of coders and open-source software in providing excellent resources for free. There are some amazing photographers who are equally generous, and post their photographs online for you to use, for free, as many times as you like. Check out my top five royalty-free photography websites here.
It takes some time and thought to select photographs from these sites as there are so many to choose from, but it can be a rewarding exercise. As they are free, you cannot guarantee that the photograph you want isn’t used by another website, so you don’t score so highly on original content. But they are a great cost-effective starting point, and can transform a website into something with which visitors can really engage.
Now you’ve got your great photographs. Time for a little word of warning.
Photographs increase the time it takes for your website to load, and slow loading is a real turn-off. The infographic below by Sean Work, Minister of Propoganda at Kissmetrics illustrates that point that 47% of consumers expect a webpage to load in less than 2 seconds, and 40% of people abandon a website if it takes more than 3 seconds to load.
So choose your photographs wisely – make each one count.
Once you have chosen your photographs, compressing each photograph will speed up loading time too. JPG is the best file type for photos, while GIF is best for images that are simple illustrations or blocks of colours, such as logos or clip art. Both file formats can be compressed, which speeds up load time.

Try it out in Adobe Photoshop, for example. Choose “Save for Web” under the File tab. Then adjust the overall size (it’s rare that an image needs to be larger than 2000px wide), and, if it’s a JPEG, choose Low, Medium or High (again, it’s rare you will need Extra High or Maximum). Saving a Low, Medium and High version of your image, and see what works.
So – you have your beautiful images, all correctly sized and compressed. If you are adding images to your own website via a CMS, there is one last crucial step: Alt tags.
Alt tags, or, to use the full title, Alt Attributes, need to include the description of the image, and the function of the image on the page. For example, the Alt tag for the image above is “Infographic showing load time for photography (by Cloudinary)”, which describes the image and credits the source. This information is then read by screen readers, and ensures full accessibility for your website – highly valuable for SEO.
Over to you – what tips do you have for great photography on websites?